Sunday, 27 April 2008

Sweet Little Lollipop Cakes

Sweet Little Lollipop Cakes

I’m thrilled to tell you that I’ve joined the Daring Bakers, that fearless group of blogging bakers that dare to go where no other baker has gone before. OK well maybe that’s over dramatising things a touch but nonetheless I’m sure that they’ll help me to push my baking boundaries and experiment with recipes that I otherwise wouldn’t have come across or tried.

silueta2

For anyone who’s unfamiliar with the Daring Bakers, they’re a group of over 400 bloggers across the world that each bake the same recipe each month, chosen by fellow members. For this month, and my first challenge, the recipe was for these Cheescake Pops from the book ‘Sticky, Chewy, Messy, Gooey’ by Jill O’Connorc.

To make these cute lollipops you bake a cheesecake, create little balls from it and coat them in chocolate. It was all very straightforward but I found forming the balls quite messy and at times the cheesecake mixture came apart in my hands. I also found, as did several other Daring Bakers, that the cake took much longer to cook than specified – 70 minutes for me. I halved the recipe and used 3 whole eggs, which worked out just fine. Here’s the original recipe:

Cheesecake Pops

Makes 30 – 40 Pops

Ingredients
5 8-oz. packages cream cheese at room temperature
2 cups sugar
¼ cup all-purpose flour
¼ teaspoon salt
5 large eggs
2 egg yolks
2 teaspoons pure vanilla extract
¼ cup heavy cream
Boiling water as needed
Thirty to forty 8-inch lollipop sticks
1 pound chocolate, finely chopped – you can use all one kind or half and half of dark, milk, or white (Alternately, you can use 1 pound of flavored coatings, also known as summer coating, confectionary coating or wafer chocolate – candy supply stores carry colors, as well as the three kinds of chocolate.)
2 tablespoons vegetable shortening - Optional
(Note: White chocolate is harder to use this way, but not impossible)
Assorted decorations such as chopped nuts, colored jimmies, crushed peppermints, mini chocolate chips, sanding sugars, dragees)


Method
1. Position oven rack in the middle of the oven and preheat to 325 degrees F. Set some water to boil.

2. In a large bowl, beat together the cream cheese, sugar, flour, and salt until smooth. If using a mixer, mix on low speed. Add the whole eggs and the egg yolks, one at a time, beating well (but still at low speed) after each addition. Beat in the vanilla and cream.

3. Grease a 10-inch cake pan (not a springform pan), and pour the batter into the cake pan. Place the pan in a larger roasting pan. Fill the roasting pan with the boiling water until it reaches halfway up the sides of the cake pan. Bake until the cheesecake is firm and slightly golden on top, 35 to 45 minutes.

4. Remove the cheesecake from the water bath and cool to room temperature. Cover the cheesecake with plastic wrap and refrigerate until very cold, at least 3 hours or up to overnight.

5. When the cheesecake is cold and very firm, scoop the cheesecake into 2-ounce balls and place on a parchment paper-lined baking sheet. Carefully insert a lollipop stick into each cheesecake ball. Freeze the cheesecake pops, uncovered, until very hard, at least 1 – 2 hours.

6. When the cheesecake pops are frozen and ready for dipping, prepare the chocolate. In the top of a double boiler, set over simmering water, or in a heatproof bowl set over a pot of simmering water, heat half the chocolate and half the shortening, stirring often, until chocolate is melted and chocolate and shortening are combined. Stir until completely smooth. Do not heat the chocolate too much or your chocolate will lose it’s shine after it has dried. Save the rest of the chocolate and shortening for later dipping, or use another type of chocolate for variety.
Alternately, you can microwave the same amount of chocolate coating pieces on high at 30 second intervals, stirring until smooth.

7. Quickly dip a frozen cheesecake pop in the melted chocolate, swirling quickly to coat it completely. Shake off any excess into the melted chocolate. If you like, you can now roll the pops quickly in optional decorations. You can also drizzle them with a contrasting color of melted chocolate (dark chocolate drizzled over milk chocolate or white chocolate over dark chocolate, etc.) Place the pop on a clean parchment paper-lined baking sheet to set. Repeat with remaining pops, melting more chocolate and shortening (or confectionary chocolate pieces) as needed.

8. Refrigerate the pops for up to 24 hours, until ready to serve.

And here’s the list of ingredients, converted into British measurements, which I used:

565 cream cheese
200g caster sugar
15g plain flour
3 whole eggs
1 teaspoon pure vanilla extract
30 ml double cream
100g milk chocolate
1 teaspoon vegetable fat (Trex)

I used an 8 inch pan and this was perfect. I did actually use a springform pan despite advice to the contrary and simply covered the bottom in two layers of tin foil to prevent the water leaking in. I couldn’t find any lollipop sticks so I just cut up some drinking straws.

P.S. I've been listening to Mika's album recently and thought this was apt and would be good for some Sunday evening entertainment:


Friday, 25 April 2008

Blog Talk and Mojitos

Trusted Places Interview

Earlier in the week I spent a very enjoyable evening with the lovely Walid and Laura from Trusted Places. They are doing a series of great interviews on the Trusted Places blog and had asked if they could interview me. Of course I was delighted to accept.

Trusted Places is an online social network where everyday people review bars, restaurants and other leisure places in London and across the UK. You can create a profile on the site and discover new places whilst sharing your experiences of the places you know. You can find out more here.

Walid and Laura made me feel right at home and after the interview they took me out for the best Mojitos in town! They were absolutely delicious; no wonder they come so highly recommended by the Trusted Places community.

Watch the interview.

Tuesday, 22 April 2008

Shake it, Baby!

Stir frying is such a great way of cooking; it’s healthy, quick and easy, and offers so much variety. It’s a really fun way to cook too; chopping the vegetables, throwing ingredients into the wok, making the food jump around - child's play! But as easy as it is, as with anything, there are some things it pays to do to make sure you get really good results. I'm no expert but I’ve picked up a few tips over time:

• Stir frying is all about keeping the food moving all the time
• The wok needs to be very hot – hotter than you may think
• Have all your ingredients prepared, chopped and to hand so you can just throw them into the wok when you need to

As I say, I’m no expert, so I thought I’d ask the lovely Nilmandra from ‘Soy and Pepper’ for some advice. She kindly agreed to an interview so that we could all find out a little bit more about her at the same time. I’m sure you’ll enjoy reading it and afterwards pop over to her fantastic blog for some really great recipes.

1) Tell us about yourself and your cooking.

I am an ethnic-Chinese Singaporean currently living in the UK. Like many expatriates and students living abroad (especially from Asian countries), I miss the delicious, cheap and huge variety of food from home. Since I could not get most of those dishes in restaurants here (at least not easily or cheaply), I started to cook them myself to satisfy my cravings. I enjoy playing with different ingredients, recipes, techniques and presentation, and experiment with food and recipes ranging from Chinese, Southeast Asian and Japanese, to British and Mediterranean.

2) What is your favourite dish to cook in a wok?

So many dishes could be cooked in a wok since it is such a versatile tool, it’s really hard to choose one! Fried bee hoon (rice vermicelli) is always a winner especially when entertaining. It’s a one dish meal so everything could be cooked very quickly in one go, which leaves me plenty of time with my guests and minimal time in the kitchen. The husband loves beef with ginger and spring onions, which is another quick wok dish. A simple vegetable stir fry of leafy greens, such as spinach, bak choy, choy sum or Chinese leaf/cabbage really make full use of the shape and size of a wok as it helps keep all the food in without having spillage over the sizes (always a problem with skillets!) while providing plenty of room for the leafy vegetables to cook through.

3) What tips can you give us for cooking with a wok?

Always start by heating a wok before adding anything to it. Wait until the surface starts to smoke very slightly, add oil to coat the surface and then wait to allow the oil to heat up before adding your ingredients. Pre-heating before adding oil will prevent food from sticking.

Spread the food around the sides of the wok instead of having them in a lump in the centres. The food should be tossed and stirred around to spread the heat and flavours evenly. Most stir frying should be done on medium-high heat. For this reason, gas tends to outperform electric stoves as the latter often has problems producing the high and constant heat that wok cooking requires.

Do not cook too much in a wok at one time. Either cook in two batches or buy a bigger wok. Overcrowding the wok means the food cannot move around the wok easily and will not cook evenly.

4) What should you look out for when choosing a wok?

Food needs to move around in a wok quickly in order to cook evenly and take advantage of the high heat cooking. So make sure you choose one that is sufficiently wide and deep for the amount you plan to cook. Also check that your cooker will accommodate the size that you want to buy. An 8-portions wok will not fit on a tiny cooker (especially if it is a gas stove with small grate fittings on top).

You want a wok that is heavy enough to stay on the stove top without toppling over with all that stir frying action, but still light enough not to be unwieldy if you want to grab and flick the handle to toss the food around. Try to find a nice medium. A wok that is too heavy or thick will take too long to heat up, which is not useful for high heat stir frying. A light or medium-weight carbon steel wok is relatively in expensive and is often the most popular amongst the Chinese and Southeast Asians. But more people are also opting for those with non-stick surfaces for easy cleaning and maintenance. Most traditional carbon steel woks are round at the bottom which requires a wok burner fitting on stove tops or a wok ring (a round band of metal that the wok sits on). If you don’t have a wok burner on your stove (which is not common outside of Asia), get a wok that has a flat bottom otherwise it will not sit properly on your stove.

Most woks come with a long handle (useful for holding on to for stability or tossing) or two round handles on the sides. Look for wooden handles or other material that will remain cool and safe to touch while the wok is hot.

If you have access to a Chinatown or oriental food store/supermarket nearby, that should be your first stop in wok shopping. They are cheaper and often better than the woks that you find in major department stores. There are still good woks available at major shops, as long as you keep an eye out for the weight and material.

5) And how should you care for it once you've bought it?

When new, wash with warm soapy water. It is important to season your wok before first use, even if it has a non-stick coating. Open the kitchen windows, make sure the room is well ventilated. Heat the wok on high heat until excess water has evaporated and the surface is shimmering with heat. Remove from heat, apply some vegetable oil (peanut or corn oil is good; olive oil has a low smoking point and will smoke your kitchen out) and spread all a thin film of oil all over the inside with a paper towel (held with tongs if you want to be safe). Be careful not to burn yourself as the wok will be very hot. Turn the heat up again for a few minutes until the surface is smoking slightly. Then remove from heat and allow the wok to cool completely to room temperature. Heat up the wok again and repeat the above steps, applying oil and allow to cool down again, another 1-3 times (more if it doesn’t have a commercial non-stick coating, in order for the wok to develop its own protective layer). Once completely cool, clean the surface lightly with a paper towel to absorb excess oil and it is ready for use.

After cooking, wash the wok with warm water and use a spatula, or non abrasive sponge to scrape off any bits that are stuck (they should come off with little force). Use little or no soap as it will remove the protection oil coating. Dry the wok with a cloth or by heating on the stove (to evaporate moisture) before storing. Your wok will require more attention when new but will developed a good coating over time through repeated use. Re-season your wok from time to time, especially with frequent use, to maintain its shiny and protective coating and you will have a versatile pan that should last for years.

Thursday, 17 April 2008

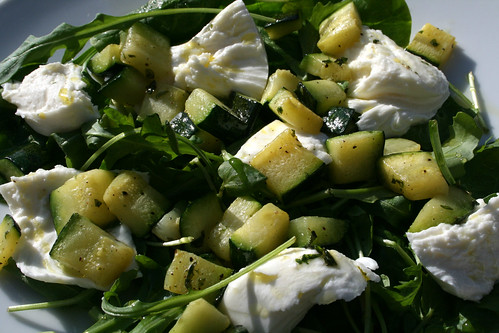
Courgette, Mint and Buffalo Mozzarella Salad

Courgette, Mint and Buffalo Mozzarella Salad

The lone courgette that I’d retrieved from the back of the fridge lay on the chopping board for some time this lunchtime before I finally decided what to make with it. I was determined that it wouldn’t end up in the bin and besides, I was hungry. I turned to Jamie Oliver for inspiration, flicking to the pages on courgettes in his ‘Jamie at home’ book, and sure enough there was the inspiration I was looking for; the suggestion of teaming courgette with mint. This was perfect as I have lots of mint in the kitchen at the moment - I'm currently going through a phase of experimenting with it. I’m finding that mint works very well with a whole array of ingredients, and that there’s much more mileage in this astonishingly fragrant herb than just lamb and new potatoes!

I also had a bag of green leaves and some buffalo mozzarella in the fridge so put together this salad, which of course had the benefit of being quick and easy to prepare. It all married together nicely and the courgettes were extremely flavoursome with the mint, sea salt and black pepper – be generous with the seasoning if you decide to try this.

Courgette, Mint and Buffalo Mozzarella Salad

Ingredients
1 courgette
1 ball of buffalo mozzarella
4 large handfuls of green salad leaves
6 mint leaves
A squeeze of fresh lemon juice
Extra virgin olive oil
Sea salt
Black pepper

Dice the courgette and finely chop the mint leaves. Heat about a tablespoon of olive oil in a frying pan and add the courgette and mint leaves. Season generously with sea salt and black pepper and sauté over a medium heat until the courgette just starts to colour and soften, but still has a bite in the middle.

Tear the mozzarella into pieces and lay it over the salad leaves. Allow the courgette to cool a little and then scatter it over the salad. Finish with a drizzle of extra virgin olive oil and a squeeze of lemon juice.

Serves 2

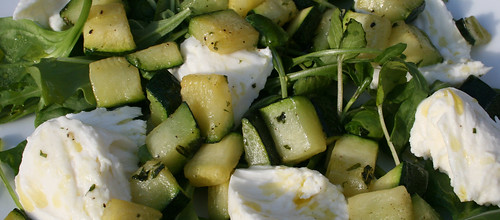
Courgette, Mint and Buffalo Mozzarella Salad 2

Related Posts with Thumbnails